A cappuccino is an espresso-based drink traditionally prepared with equal parts (1:1:1 ratio) of espresso, steamed milk, and milk foam, served in a small 150-180 ml cup. The name derives from Capuchin friars' brown robes, which matched the color of early coffee-with-milk mixtures. This guide details the precise technique for creating café-quality cappuccinos at home.
Cappuccino History and Definition
The cappuccino originated in 17th-century Vienna as kapuziner (coffee with cream, sugar, and spices), evolving in early 20th-century Italy with steamed milk after espresso machines popularized concentrated shots. In Italy, cappuccino is defined strictly as 25 ml espresso plus equal parts milk and foam, limited to mornings and small sizes. The drink's name references the Capuchin friars' brown hooded robes, which matched the color of the beverage.
The Traditional 1:1:1 Cappuccino Ratio
The traditional Italian ratio is 1:1:1—one part espresso (25-30 ml), one part steamed milk, and one part milk foam—totaling approximately 150-180 ml. This balance emphasizes the bold espresso while the foam provides structure and insulation. Deviations from this ratio create different drinks: more milk transforms it into a latte; less foam creates a flat white. Italian standards enforce the thirds to maintain the cappuccino's distinctive character.
Milk Steaming Technique for Microfoam
Proper milk steaming creates microfoam—fine, silk-like bubbles without large froth. Steam milk to a maximum of 150°F (65°C) to unravel milk proteins and develop the velvety texture. Hold the pitcher at a 45-degree angle initially to incorporate air (stretching phase), with the wand tip just below the surface creating a "tearing paper" sound. Then submerge the wand fully and angle downward for swirling to integrate and velvetize the texture.
Tap the pitcher firmly on the counter to remove large bubbles, then swirl to unify the microfoam. Avoid exceeding 150°F to prevent scalding or introducing bitterness. The final microfoam should be glossy and paint-like, suitable for latte art designs. This technique requires practice—expect 20-30 seconds of steaming for a single cappuccino.
Step-by-Step Cappuccino Preparation
1. Pull the Espresso Shot
Pull a 25-30 ml espresso shot into a preheated 150-180 ml porcelain cup. Use fresh, medium-to-dark roast beans ground to a fine espresso setting. Tamp with 30 pounds of pressure. Extract for 25-30 seconds at 9 bars pressure. The espresso should display a dark mahogany color with golden crema. A proper espresso base is essential—weak or over-extracted shots will ruin the cappuccino.
2. Steam the Milk
Pour 25-30 ml of cold whole milk into a stainless steel pitcher. Insert the steam wand just below the surface at a 45-degree angle. Open the steam valve fully. Listen for a "tearing paper" sound as air incorporates into the milk (stretching phase, approximately 3-5 seconds). Then submerge the wand fully and angle the pitcher downward to create a whirlpool motion. Continue steaming until the pitcher becomes too hot to hold comfortably (approximately 150°F/65°C). Remove the wand and tap the pitcher to remove large bubbles.
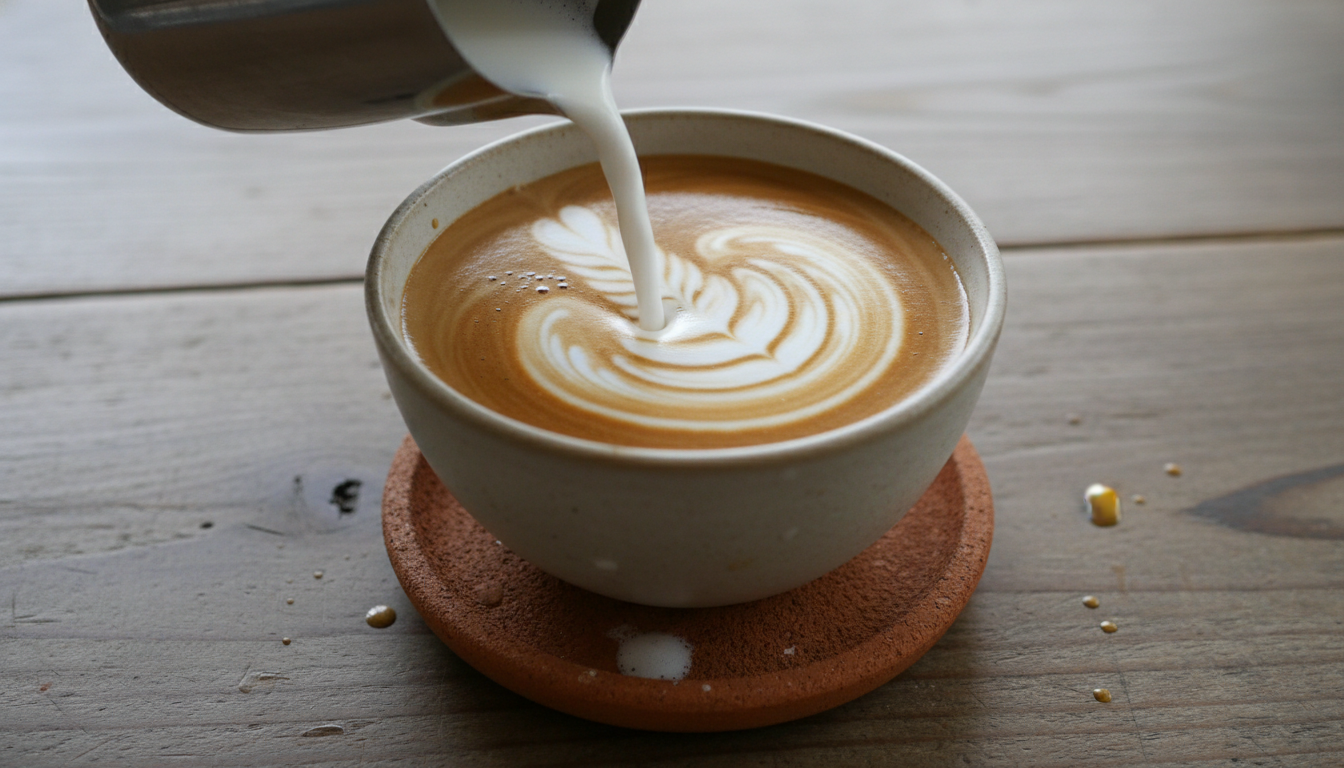
3. Pour the Milk and Foam
Pour the steamed milk directly into the espresso shot, holding the pitcher at a low height (2-3 cm) to integrate the milk. Then spoon the microfoam on top to form a thick 1 cm or thicker layer. The foam should sit prominently on the surface, creating the cappuccino's distinctive appearance. Serve immediately in the preheated porcelain cup to retain heat.
4. Optional: Dust with Cocoa
Dust the foam with unsweetened cocoa powder or chocolate powder (traditional in Italy). This adds visual appeal and a subtle flavor note without overwhelming the espresso.
Cappuccino vs Latte vs Flat White
| Drink | Ratio | Foam | Size | Key Trait |
|---|---|---|---|---|
| Cappuccino | 1:1:1 (espresso:milk:foam) | Thick, dry layer (1/3 volume) | 150-180 ml | Bold espresso, prominent foam |
| Latte | 1:3-5 (espresso:total milk) | Thin microfoam layer | 200-300 ml | Milky, velvety, less foam |
| Flat White | 1:2 (espresso:velvety milk) | Minimal, microfoam only | 150-180 ml | Silkier texture, more milk than cappuccino |
Common Cappuccino Mistakes
- Oversteaming milk: Heating milk beyond 150°F (65°C) causes bitterness and deflates foam. Use a thermometer to monitor temperature precisely.
- Wrong espresso temperature: Espresso cooler than 195°F results in sour extraction. Milk too hot or scalded introduces burnt flavors.
- Poor espresso base: Weak extraction or lack of crema dilutes the cappuccino's flavor. A proper espresso shot is non-negotiable.
- Incorrect ratios: Excess milk turns the drink into a latte-like beverage, losing balance. Insufficient foam creates a wet, unstructured drink.
- Pouring technique errors: Pouring foam first mixes unevenly. Not swirling milk post-steaming leaves large bubbles instead of microfoam.
Equipment Needed for Cappuccinos
- Espresso machine with commercial-style steam wand: Powerful, adjustable steam for microfoam creation. Avoid super-automatic machines with auto-frothing for best results.
- Stainless steel milk pitcher: 12-20 oz capacity with narrow spout for pouring control. Stainless steel conducts heat evenly.
- Digital thermometer: Clip-on style for precise 150°F (65°C) temperature monitoring during steaming.
- Preheated porcelain cup: 5-6 oz (150-180 ml) with handle. Porcelain retains heat better than ceramic.
- Quality grinder: Burr grinder for consistent espresso particles. Blade grinders produce uneven extraction.
Latte Art Basics for Cappuccinos
Use microfoam (glossy, 150°F) for designs on the thin top foam layer. Pour from a pitcher height of 3-5 cm to the center of the cup to create a white heart base. Lower the pitcher to the surface and wiggle for dividing lines, then pull back for leaf or tulip tips. Cappuccino's thicker foam limits design complexity compared to lattes, but simple hearts and rosettas are achievable with practice. Focus on steady hand control and consistent pitcher tilt for clean edges.
Final Verdict: Mastering the Cappuccino
The cappuccino represents the perfect balance between espresso intensity and milk smoothness. Mastering the 1:1:1 ratio and microfoam technique unlocks café-quality drinks at home. The key is precision: proper espresso extraction, milk steamed to exactly 150°F, and the correct pour technique. Expect 20-30 attempts before consistency develops. The ritual of steaming milk and pouring foam connects you to the craft of espresso, transforming a simple beverage into an art form.
Ready to Perfect Your Milk Steaming?
Milk steaming is a skill that improves with practice. Master the fundamentals with our complete milk steaming guide.
Learn advanced milk steaming and latte art techniques →