Espresso Puck Prep: Complete WDT and Distribution Guide
Master the art of espresso puck preparation—eliminate channeling, ensure even extraction, and unlock the full potential of your espresso through proper WDT and distribution techniques
Quick Answer: Espresso Puck Preparation
Proper espresso puck preparation requires three steps: WDT (Weiss Distribution Technique) using thin needles to break up clumps and distribute grounds evenly, leveling the coffee bed to create a flat surface, and consistent tamping with 15-30 pounds of pressure. Good puck prep eliminates channeling where water finds paths of least resistance, ensuring even extraction and better-tasting espresso.
Why Espresso Puck Preparation Matters
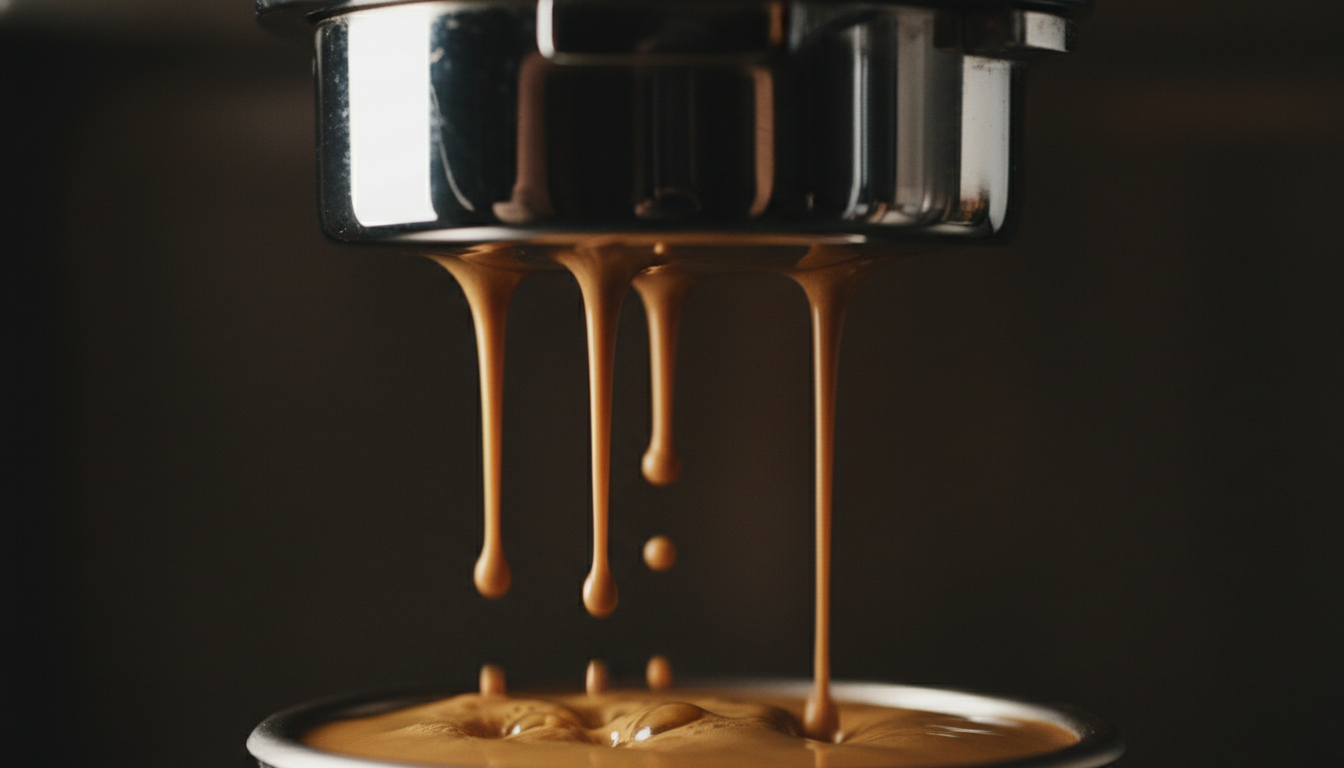
Espresso extraction depends on water passing through a compacted bed of coffee grounds at 9 bars of pressure. For optimal extraction, water should flow through the entire coffee bed uniformly. Inconsistent density, clumps, or uneven distribution create channels—paths of least resistance where water flows preferentially, bypassing grounds and creating uneven extraction.
Channeling produces several problems: sour and bitter flavors simultaneously (under-extracted and over-extracted areas), weak body, inconsistent shot times, and messy extractions that spray from the portafilter. Even the finest coffee beans and most expensive espresso machine cannot overcome poor puck preparation.
Proper espresso puck preparation addresses these issues before extraction begins. By breaking up clumps, distributing grounds evenly, and creating a level, uniformly dense coffee bed, puck prep ensures water contacts all grounds equally. The result is balanced extraction, full body, and the full expression of the coffee's flavor potential.
Signs of Poor Puck Prep
- • Channeling (visible spurts from portafilter)
- • Sour and bitter flavors simultaneously
- • Inconsistent shot times
- • Wet, mushy puck after extraction
- • Uneven extraction marks on spent puck
- • Weak, thin body in the cup
Signs of Good Puck Prep
- • Even, uniform extraction flow
- • No spurting or spraying
- • Consistent shot times
- • Dry, solid puck after extraction
- • Clean extraction marks on spent puck
- • Rich, full body with balanced flavor
The Three Steps of Espresso Puck Preparation
Step 1: WDT (Weiss Distribution Technique)
WDT uses thin needles (0.3-0.4mm diameter, typically acupuncture needles) to break up clumps and distribute coffee grounds evenly throughout the portafilter basket. Ground coffee naturally clumps due to static electricity and oil content. These clumps create density variations that cause channeling.
WDT Technique:
- 1. Insert WDT tool needles into the coffee grounds
- 2. Make gentle circular motions throughout the basket
- 3. Reach all areas including the edges
- 4. Continue for 10-15 seconds until grounds appear fluffy
- 5. Sweep tool horizontally to level the surface
Key Point: WDT should be gentle—aggressive stirring can create fines migration (small particles moving to the bottom), which causes its own extraction problems.
Step 2: Distribution and Leveling
After WDT, the coffee bed needs leveling to create a flat surface for even tamping. Uneven coffee beds produce uneven tamping pressure, leading to high and low density areas that cause channeling.
Distribution Methods:
Stockfleth's Move (Finger)
Use fingers to sweep coffee grounds in a circular motion, filling low spots and removing high spots. Rotate the portafilter while sweeping.
Distribution Tool
Spin a distribution tool (OCD-style) on the coffee bed to level and evenly distribute grounds before tamping.
Step 3: Tamping
Tamping compresses the coffee bed to create resistance for proper extraction pressure. Consistent tamping pressure ensures uniform density throughout the puck.
Proper Tamping Technique:
- 1. Hold tamper like a flashlight grip, elbow at 90 degrees
- 2. Rest tamper on the coffee bed
- 3. Apply firm, even pressure (15-30 lbs)
- 4. Keep tamper perfectly level—check from multiple angles
- 5. Press until resistance stops (fully compressed)
- 6. Lift straight up without twisting
Note: Excessive tamping pressure (over 30 lbs) does not improve extraction and increases repetitive strain injury risk. Focus on consistency rather than maximum force.
WDT Tools: Options and Selection
| WDT Type | Pros | Cons | Best For |
|---|---|---|---|
| DIY (Paperclip/Needle) | Free/cheap, readily available | Uncomfortable grip, inconsistent spacing | Beginners testing WDT |
| 3D Printed | Affordable ($10-20), customizable | Variable quality, durability concerns | Budget-conscious users |
| Metal Handle WDT | Durable, comfortable grip, adjustable | $20-50 price range | Daily espresso makers |
| Spring-Loaded | Consistent depth, ergonomic | $40-80, more complex | Serious enthusiasts |
Needle Specifications
Optimal Needle Properties
- Diameter: 0.3-0.4mm (acupuncture needle size)
- Count: 4-8 needles for even coverage
- Length: Long enough to reach basket bottom
- Material: Stainless steel (resists bending)
Needles to Avoid
- Thick needles (>0.5mm): Create channels rather than break clumps
- Sharp tips: Can damage basket coating
- Flexible wires: Bend during use, inconsistent depth
- Single needle: Insufficient coverage for clump breakdown
Common Puck Preparation Mistakes
Mistake: Skipping WDT with Coarse Grinds
Problem: Even coarse grinds contain clumps from static and oil adhesion.
Solution: WDT benefits all grind sizes. Coarse grinds may need gentler technique but still require clump breakdown.
Mistake: Over-Aggressive WDT
Problem: Vigorous stirring moves fine particles to the bottom, creating a dense layer that restricts flow.
Solution: Use gentle, controlled movements. WDT should fluff, not excavate.
Mistake: Uneven Tamping
Problem: Tilting the tamper creates high and low density areas, causing channeling.
Solution: Check tamper level from multiple angles before applying pressure. Use a mirror or level tamper if needed.
Mistake: Tamping Twisting
Problem: Twisting the tamper while compressing or lifting disturbs the puck seal.
Solution: Press straight down, lift straight up. No twisting motion.
Mistake: Tapping After Tamping
Problem: Tapping the portafilter on the counter after tamping cracks the puck, creating channels.
Solution: Tap only before tamping to settle grounds. Never tap after tamping.
Mistake: Inconsistent Dosing
Problem: Varying dose weights change puck density and extraction characteristics.
Solution: Use a scale to measure dose weight consistently (±0.1g precision).
Diagnosing and Fixing Channeling
Channeling occurs when water finds paths of least resistance through the coffee puck, bypassing some grounds while over-extracting others. Identifying channeling type helps determine which puck preparation step needs improvement.
| Channeling Type | Visual Signs | Likely Cause | Solution |
|---|---|---|---|
| Edge Channeling | Water runs down basket sides | Poor WDT at edges | Ensure needles reach basket perimeter |
| Center Channeling | Gusher from center | Clump in center, uneven tamp | Thorough WDT, level tamping |
| Spraying | Droplets spray from portafilter | Major density variation | All puck prep steps need improvement |
| Blonding Streaks | Light streaks in dark extraction | Localized under-extraction | Better distribution, check for cracks |
Using a Naked Portafilter for Diagnosis
A naked (bottomless) portafilter removes the spouts, exposing the entire extraction. This visibility makes channeling immediately apparent as spurts, uneven flow, or blond streaks.
Naked portafilters also help diagnose tamping issues. An uneven tamp produces an extraction that starts on one side of the basket first. Ideal extraction begins simultaneously across the entire puck surface.
Grinder Impact on Puck Preparation
Grinder quality significantly affects puck preparation difficulty. Better grinders produce more uniform particle distribution with fewer clumps, making WDT and distribution easier.
Entry-Level Grinders
Produce more clumps and uneven particle distribution.
Puck Prep Importance: Critical. WDT is essential to break up clumps and even out density variations.
Premium Grinders
Produce uniform particles with minimal clumping.
Puck Prep Importance: Still beneficial but less critical. Light WDT and careful distribution still improve consistency.
Even with premium grinders, static electricity and coffee oils cause some clumping. WDT provides insurance against these inevitable clumps, ensuring consistent extraction regardless of grinder quality.
Related Espresso Technique Guides
Best WDT Tools for Espresso
Review and comparison of top WDT tools for puck preparation
RDT vs WDT: Puck Prep Priorities
Understanding Ross Droplet Technique and WDT combinations
How to Fix Espresso Channeling
Comprehensive troubleshooting for channeling problems
Espresso Dose and Yield Ratios
Understanding the relationship between dose and extraction
Frequently Asked Questions
Is WDT really necessary for espresso?
WDT is not strictly necessary—many people make acceptable espresso without it. However, WDT significantly improves consistency and extraction quality, especially with entry-level grinders or clump-prone coffee. For best results and reduced channeling, WDT is highly recommended.
Can I use a toothpick instead of a WDT tool?
A single toothpick provides insufficient coverage. Multiple thin needles (4-8) are needed for effective clump breakdown. A DIY WDT can be made by inserting several acupuncture needles (0.3-0.4mm) into a wine cork or 3D-printed handle.
How hard should I tamp espresso?
Tamp with 15-30 pounds of pressure until the puck fully compresses and resists further compression. Excessive pressure (over 30 lbs) does not improve extraction and increases injury risk. Consistency matters more than exact pressure—tamp the same way every time.
Do I need a distribution tool if I use WDT?
WDT breaks up clumps but doesn't perfectly level the bed. A distribution tool or Stockfleth's move (finger leveling) after WDT ensures a flat surface before tamping. Both steps together produce more consistent results than either alone.
Why is my puck wet and mushy after extraction?
A wet, mushy puck usually indicates channeling—water found paths through the puck rather than extracting evenly. Check your WDT technique for thorough clump breakdown, ensure level tamping, and verify consistent dose weight. A properly extracted puck should be firm and dry.
Mastering Espresso Puck Preparation
Proper espresso puck preparation transforms inconsistent, channel-prone shots into balanced, flavorful extractions. The three-step process—WDT for clump breakdown, distribution for leveling, and consistent tamping for uniform density—addresses the root causes of channeling.
While puck preparation requires additional time and tools, the improvement in espresso quality justifies the effort. Even modest grinders and machines produce café-quality espresso when paired with meticulous puck prep.
Make WDT, distribution, and careful tamping habitual parts of your espresso routine. The consistency and quality improvements will be immediately apparent in the cup—balanced flavor, full body, and the full expression of your coffee's potential.