How to Pull Your First Espresso Shot: Complete Beginner Guide
Master the fundamentals of espresso extraction with step-by-step instructions designed for beginners. From dosing to tasting, learn how to pull consistent, delicious shots at home.
Quick Answer
Grind 18g coffee fine, distribute evenly, tamp with 30 lbs pressure, lock portafilter, start extraction, aim for 25-30 seconds to yield 36g espresso. Taste and adjust grind if needed.
What Does "Pulling a Shot" Mean?
"Pulling a shot" originates from early espresso machines that required the barista to pull a lever to create pressure for extraction. While modern machines use electric pumps, the terminology remains. Today, pulling a shot refers to the complete process of extracting espresso coffee by forcing hot water (90-96°C) through finely ground, compacted coffee at approximately 9 bars of pressure.
A properly pulled espresso shot consists of three distinct phases: pre-infusion (low-pressure water saturation), extraction (full-pressure brewing), and blonding (color change signaling completion). Understanding these phases helps you recognize when a shot is progressing correctly and when to stop extraction for optimal flavor.
The goal of your first shot isn't perfection—it's establishing a baseline. Every espresso machine, grinder, and coffee bean combination behaves differently. Your first shot provides reference data: Was it too fast or slow? Sour or bitter? These observations guide your adjustments toward the 25-30 second target that produces balanced, sweet espresso.
Equipment Needed for Your First Shot
You don't need professional equipment to pull drinkable espresso, but these essential tools make the process significantly easier and more consistent. Here's what you need before starting:
Espresso Machine
Generates 9 bars of pressure for extractionAny home espresso machine with pressurized or non-pressurized basket
Burr Grinder (or Pre-ground)
Produces consistent particle size for even extractionEntry-level electric or hand grinder; or fresh pre-ground espresso grind
Digital Scale (0.1g precision)
Measures precise dose (input) and yield (output)Critical for consistency; timers help track extraction time
Tamper
Compresses coffee puck evenly for uniform resistanceMatch diameter to your portafilter basket size
Distribution Tool (optional)
Creates level coffee bed before tampingWDT tool or simple needle works for breaking up clumps
💡 Pro Tip: Start Simple
Don't let equipment limitations stop you. If you don't have a grinder, buy fresh pre-ground espresso from a local roaster and use the pressurized basket that came with your machine. Focus on mastering dose, distribution, and tamping before upgrading equipment.
Step-by-Step: The 5-Stage Espresso Process
Follow these five stages in order. Each builds on the previous, creating the foundation for consistent extraction. Visual cues help you verify each step before proceeding.
Dose
Measure 18g of coffee beans
Weigh whole beans before grinding, or pre-ground coffee directly. For single shots, use 9g. Double shots (18g) are easier for beginners due to puck stability.
Visual Guide: Scale shows 18.0g with coffee in dosing cup
Grind
Grind to fine espresso consistency
Aim for texture like fine table salt or sand. If using pre-ground, ensure it's labeled 'espresso grind.' Too coarse = fast, sour shots; too fine = slow, bitter shots.
Visual Guide: Coffee grounds resembling fine granulated sugar
Distribute
Level and break up clumps
Transfer grounds to portafilter basket. Tap sides to settle. Use WDT (Weiss Distribution Technique) with a thin needle or distribution tool to break clumps and create flat surface.
Visual Guide: Even, level coffee bed before tamping
Tamp
Compress with 30 lbs pressure, level
Rest portafilter on flat surface. Place tamper level on coffee bed. Press straight down with firm, even pressure (~30 lbs/14 kg). Twist slightly to polish. Surface should be smooth and level.
Visual Guide: Level tamp with straight wrist, perpendicular to basket
Extract
Lock portafilter and start brewing
Insert portafilter into group head at 90° angle. Rotate firmly to lock. Place warmed cup under spouts. Start extraction immediately. Timer begins when first drop appears.
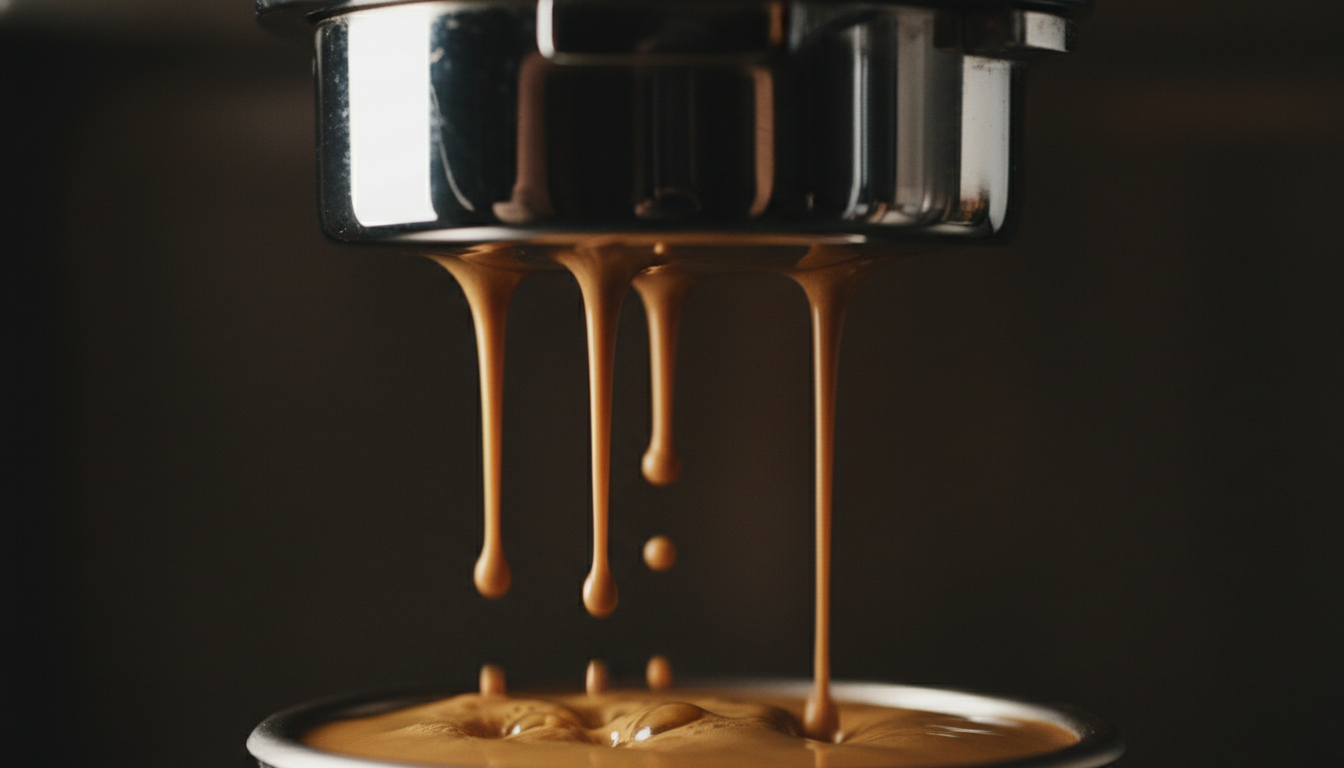
Visual Guide: Two streams of espresso flowing like 'mouse tails' into cup
Timing Your Shot: The 25-30 Second Rule
Extraction time is your primary quality indicator. Time starts when the first drop of espresso hits the cup and ends when the stream becomes blonde or you reach your target yield (typically 36g). Use this guide to interpret your results:
| Time | Status | Flavor | Adjustment |
|---|---|---|---|
| Under 20 seconds | Under-extracted | Sour, thin, salty | Grind finer |
| 20-24 seconds | Fast extraction | Bright, slightly weak | Grind slightly finer |
| 25-30 seconds | Optimal extraction | Balanced, sweet, complex | Target achieved |
| 31-35 seconds | Slow extraction | Strong, slightly bitter | Grind slightly coarser |
| Over 35 seconds | Over-extracted | Bitter, harsh, burnt | Grind coarser |
⏱️ Why 25-30 Seconds Matters
This timeframe extracts approximately 18-22% of the coffee's soluble compounds—the "sweet spot" where desirable flavors (sugars, acids, aromatics) dissolve without pulling out excessive bitterness. Under 25 seconds, you get only bright acids. Over 30 seconds, harsh compounds dominate.
Reading the Extraction: Visual Cues
Your eyes provide real-time feedback during extraction. Learn to recognize these visual indicators to assess shot quality before tasting:
Color Flow
Dark brown → caramel → golden blonde (tiger striping)
Immediate blonde gushing or dark throughout
Stream Appearance
Two steady streams like 'mouse tails,' thick viscosity
Spraying, thin dribbles, or single stream
Crema Formation
Thick, persistent golden-brown layer (1/4 inch)
Thin, pale, or disappearing quickly; large bubbles
Flow Rate
Honey-like consistency, steady drips coalescing
Gushing water or thick syrup barely moving
Taste Assessment: Sour vs Bitter Diagnosis
Taste is the ultimate quality metric. These three flavor profiles indicate extraction status and guide your adjustments:
Sour / Bright / Thin
Under-extractionGrind too coarse, insufficient dose, fast flow
Grind finer, increase dose slightly, extend extraction time
Bitter / Harsh / Burnt
Over-extractionGrind too fine, excessive dose, slow flow
Grind coarser, reduce dose slightly, shorten extraction time
Balanced / Sweet / Smooth
Optimal extractionProper grind, dose, and timing aligned
Maintain current settings; note parameters
👅 Tasting Technique
Taste espresso immediately after brewing (when flavors are most vibrant), then again after 30 seconds (when harshness becomes apparent). Cleanse your palate with water between tastings. Focus on the aftertaste—lingering pleasantness indicates good extraction; harshness indicates over-extraction.
Common First-Shot Problems & Solutions
Every beginner encounters these issues. Recognize them quickly and apply the appropriate fix:
No coffee coming out
Cause: Grind too fine or tamped too hard
Solution: Stop extraction immediately. Coarsen grind significantly. Use lighter tamp pressure.
Coffee sprays everywhere
Cause: Channeling from uneven distribution
Solution: Improve distribution before tamping. Check for cracks in puck. Use WDT technique.
Shot finishes in 15 seconds
Cause: Grind too coarse or insufficient dose
Solution: Adjust grinder 2-3 steps finer. Verify 18g dose. Check basket size compatibility.
Weak, watery espresso
Cause: Under-extraction or stale coffee
Solution: Grind finer. Use coffee roasted within 2-4 weeks. Increase dose to 19-20g.
No crema on shot
Cause: Stale beans or insufficient pressure
Solution: Use fresh coffee (2-14 days post-roast). Check machine pressure gauge reads 9 bar.
Portafilter stuck
Cause: Tamped too hard or grind too fine
Solution: Turn machine off. Let cool. Gently tap group head side. Never force.
Practice Routine: Building Consistency
Consistency separates beginners from skilled home baristas. Follow this daily practice routine for one week:
Daily Consistency Drill
- 1 Pull 3 shots back-to-back using identical parameters
- 2 Record dose, grind setting, time, and yield for each
- 3 Taste each shot and note flavor characteristics
- 4 Adjust only ONE variable (grind) between sessions
- 5 Aim for consistency: all three shots within 2-3 seconds of each other
- 6 Repeat daily for one week to develop muscle memory
✓ Success Metrics
- • Three consecutive shots within 25-30 seconds
- • Yield within 2g of target (36g)
- • Consistent crema color and thickness
- • Taste improves or maintains quality
📊 Tracking Template
Record for each shot:
- • Dose: ___g | Grind setting: ___
- • Time: ___s | Yield: ___g
- • Taste notes: _______________
- • Adjustment made: ___________
Continue Your Espresso Journey
Ready to Pull Your First Shot?
You've learned the theory. Now it's time to practice. Remember: your first shot won't be perfect, and that's completely normal. Every expert barista started exactly where you are now. Focus on the process, record your results, and celebrate small improvements.